
|
|
| [ / main / writing / djgppGraphics ] |
Graphics Programming in DJGPP |
(c)1996 Jeff Weeks and Code X software
|
|
||||||||||||||||||||||||||||||||||||||||||||||||||||||||||||||||||||||||||||
Introduction |
|
|
||||||||||||||||||||||||||||||||||||||||||||||||||||||||||||||||||||||||||||
|
Graphics are the key to almost all programs, but, as you may have already found out, graphics programming under DJGPP is a little different from other languages. This chapter will hopefully get you well on your way to programming fast graphics using DJGPP. You may understand more if you have had previous real-mode graphics programming experience, but this is not required. This chapter only describes how to write in VGA and SVGA 256 colour modes but the last section will briefly introduce higher colour modes. 16 colour modes are not discussed due to the fact that they are a lot of trouble and really aren't worth it. If you aren't serious about getting down and dirty in graphics programming I would suggest you just get a graphics library like GRX, J-LIB or Allegro and use it. Provided along with this chapter will be a C/C++ graphics library but will only include graphics primitives. |
|
|
||||||||||||||||||||||||||||||||||||||||||||||||||||||||||||||||||||||||||||
|
If you're looking for a secondary (or more likely primary) source I would strongly suggest Michael Abrash's "Zen of Graphics Programming" 2nd Edition. ISBN 1-883577-89-6. This book covers all aspects of graphics programming and is very well written. An asset to any graphics programmer. |
|
|
||||||||||||||||||||||||||||||||||||||||||||||||||||||||||||||||||||||||||||
|
Okay, with that out of the way, let's begin. On your screen you have two dimensions... width and height which are represented by X and Y axis respectively. The X axis travels horizontally, increasing to the right. The Y axis travels vertical, increasing to the bottom. This effectively makes the co-ordinate of the top-left hand corner of your screen (0,0). This is a standard way of referencing screen space. It merly consists of your X co-ordinate followed by your Y co-ordinate separated by a comma and in brackets. Similarly, a three dimensional co-ordinate would be referenced like (x,y,z). |
|
|
||||||||||||||||||||||||||||||||||||||||||||||||||||||||||||||||||||||||||||
|
To understand even the simplest act of plotting a pixel on the screen we must first learn how your video card works. A standard VGA video card has 265K of memory onboard. SVGA cards can have much more, but right now we'll just cover the VGA. This memory is used to compose your image on the screen. The video card will typically check this section of memory about 70 times a second (this is called the vertical refresh rate) and reflect the data in that memory onto the screen. What this means is that all you have to do to draw something on the screen is to edit this memory. |
|
|
||||||||||||||||||||||||||||||||||||||||||||||||||||||||||||||||||||||||||||
|
It is also important to note how video memory is aranged. However, the format changes from video mode to video mode. The PC supports many resolutions and colours depths. Each variation of either of these elements will change the format of video memory. The colour depth is the biggest factor, though. Most video modes in use today have 256 colours, however, 2, 16, 32768, 65536, 16,777,216 and even 4,294,926,296 colour modes do exist. Now, the question is, how do you arrange video memory for these different mode? The answer is actually quite simple; a linear memory system. |
|
|
||||||||||||||||||||||||||||||||||||||||||||||||||||||||||||||||||||||||||||
|
What does this mean? Well, if you take a look at all the above colour depths you'll notice they are all a multiple of 2. This is done on purpose because that means they will fit perfectly into either a 8,16 or 32 bit integer (although you'll notice they don't all really fit perfectly. The modes that don't fit perfectly provide some extra hassles but are still possible). So, video memory is set up so that the first integer of memory corresponds to the first pixel in the top, left corner. The next integer corresponds to the pixel just to the right of the top, left pixel and so on. In a 256 (8 bit) colour mode the integers are 8 bits long. In a 65536 (16-bit) colour mode the integers are 16 bits long and so on. This effectively makes the length of video memory (maximum_x * maximum_y * colour_bytes) bytes large. You should keep in mind that I am using the word "integer" for simplicity. In actuality the computer doesn't care what you poke to video memory, let alone what size it is. You can do whatever you want, however, to get the results your looking for, you should use the correct size for the video mode. |
|
|
||||||||||||||||||||||||||||||||||||||||||||||||||||||||||||||||||||||||||||
|
Okay, so how do we do all this? In simple langauges, like BASIC, you would use the built in graphics functions. However, in DJGPP, or any ANSI C/C++ implementation, you don't have the luxury of built in graphics routines. What this means, quite simply, is that you will have to write your own graphics routines in DJGPP. Video memory on the PC starts at 0xA0000, so now all we need to do is find out how to write something to that chunk of memory. That's where this chapter comes in. |
|
|
||||||||||||||||||||||||||||||||||||||||||||||||||||||||||||||||||||||||||||
Vga Mode 13h |
|
|
||||||||||||||||||||||||||||||||||||||||||||||||||||||||||||||||||||||||||||
|
Let's start off with the easiest video mode of all; VGA mode 13h. This mode has a horizontal resolution of 320 pixels and a vertical resolution of 200 pixels and has 256 colours (8-bit). Therefore this video mode takes up (320 * 200 * 1) = (64000) bytes of video memory. |
|
|
||||||||||||||||||||||||||||||||||||||||||||||||||||||||||||||||||||||||||||
|
Now, the PC, unlike some architectures, actually distinguished between text and video modes. This means that we must change into a video mode before we can do any graphics. We do this by using the video bios. The video bios is accessed through interupt 10h and is our direct connection to the video card. It's our telephone, so-to-speak. |
|
|
||||||||||||||||||||||||||||||||||||||||||||||||||||||||||||||||||||||||||||
|
To set the mode we simply load in the mode number into the AX register and call interrupt 10h. Here's some code to do just that:
void vga256(void) { __dpmi_regs regs; regs.x.ax = 0x13; /* Mode 0x13 is VGA 320x200x256, 0x3 is TEXT 80x25 */ __dpmi_int(0x10, ®s); /* same as real-mode */ return; } |
|
|
||||||||||||||||||||||||||||||||||||||||||||||||||||||||||||||||||||||||||||
|
Note that when you are done all your graphics routines and want to go back into text mode just repeat the following but replace 0x13 with 0x3. In other words, 3h is the mode number for the standard 80x25 text mode. See appendix ? for a list of video modes. |
|
|
||||||||||||||||||||||||||||||||||||||||||||||||||||||||||||||||||||||||||||
|
Now, your first step will most likely be plotting a single pixel on the screen. In any real-mode C/C++ compiler you could use poke() or inline assembly to write directly to video memory at 0xA000 but you can't do this in DJGPP because it works under protected mode. What this means is that you can't access some sections of memory because they're protected. Unfortunately video memory is one of those sections. |
|
|
||||||||||||||||||||||||||||||||||||||||||||||||||||||||||||||||||||||||||||
|
So how do we access memory we don't have access to? Well, we have to use what is called a descriptor. This is almost like a segment in real mode. The descriptors allow us to have access to parts of memory, including video memory. You just have to tell the computer to use the _dos_ds descriptor, and then plot your pixels at an offset of 0xA0000 from the beginning of it. One of the ways you can do this is by using the function dosmemput(). You would do this by... |
|
|
||||||||||||||||||||||||||||||||||||||||||||||||||||||||||||||||||||||||||||
char virt_screen[64000]; /* set the video mode here */ dosmemput(virt_screen, 64000, 0xA0000); /* go back to text mode here */ return 0; } |
|
|
||||||||||||||||||||||||||||||||||||||||||||||||||||||||||||||||||||||||||||
|
The above example would copy an entire 320x200 virtual screen to the visual screen. You will notice that we never actually used _dos_ds anywhere in the above code. All that is handled by the function _dosmemput(). You could also use _dosmemputw() and _dosmemputl(), which write words and longwords respectively. This would seem to suggest it's very fast because, afterall, it's copying 64000 bytes in one function. Keep in mind, however, that you have absolutly no idea what's going on in that function. Assume nothing! As it turns out _dosmemput() is not a fast as you might think. Infact it's one of the slowest ways of displaying a video screen. |
Virtual screens will be discussed later so don't be discouraged if this doesn't make since. Also notice that we use 0xA0000 instead of 0xA000. This is due to the dosmemput() function referring to physical memory locations. That's not very important to know, but be aware of it.
|
|
||||||||||||||||||||||||||||||||||||||||||||||||||||||||||||||||||||||||||||
|
Another method for accessing video memory is to use _farpokeb() which acts somewhat like dosmemput() but will only poke one pixel at a time. You may think that this would be a slower method, but remember, assume nothing. This actually isn't a function, it's a macro. It's faster and compiles to only about three instructions. Here's an example... |
|
|
||||||||||||||||||||||||||||||||||||||||||||||||||||||||||||||||||||||||||||
#include <go32.h> /* for the declaration of _dos_ds */ int main(void) { /* set the video mode here */ _farpokeb(_dos_ds, 0xA0000, 15) /* go back to text mode here */ return 0; } |
|
|
||||||||||||||||||||||||||||||||||||||||||||||||||||||||||||||||||||||||||||
|
This would set the pixel in the upper left hand corner of the screen to colour 15 which is, by default, white. For those that must know it compiles to this with optimization: |
|
|
||||||||||||||||||||||||||||||||||||||||||||||||||||||||||||||||||||||||||||
|
|
|
||||||||||||||||||||||||||||||||||||||||||||||||||||||||||||||||||||||||||||
|
Now you can see what is really done with _dos_ds. It's loaded into the register fs. The register in protected mode is used to hold descriptors. Now, there is an alternative to using this function which works very similarly but introduces more speed. What you would do is to call _farsetsel(_dos_ds) once and then do a bunch of _farnspokeb()'s, like this: |
|
|
||||||||||||||||||||||||||||||||||||||||||||||||||||||||||||||||||||||||||||
#include <go32.h> /* for the declaration of _dos_ds */ int main(void) { /* set the video mode here */ _farsetsel(_dos_ds); _farnspokeb(0xA0000, 15); _farnspokeb(0xA0000, 32); /* go back to text mode here */ return 0; } |
|
|
||||||||||||||||||||||||||||||||||||||||||||||||||||||||||||||||||||||||||||
|
As suggested _farpokeb() is faster than dosmemput() but still isn't the fastest approach. The next example is one of the fastest ways to access video memory but it is also the riskiest. This method actually disables memory protection. For some of you real-mode programmers that's not really a problem because you've worked without memory protection before, but remember, that's one of DJGPPs nice features; protected mode. Remember, without protection you can do almost anything with memory, including corrupt it, which means your program has a much bigger chance of crashing and hang. However, if you're willing to risk it for some speed, here's what you should do. |
|
|
||||||||||||||||||||||||||||||||||||||||||||||||||||||||||||||||||||||||||||
|
If you want to use this method you would disable memory protection using __djgpp_nearptr_enable() and now you can access video memory directly. But how do you do this without a descriptor? You have to use the __djgpp_conventional_base variable. This variable tells you where the start of conventional memory is, which you need to know because 0xA0000 is an offset from this location. Therefore, with memory protection disabled, video memory starts at __djgpp_conventional_base + 0xA0000. Now that you know this you can plot a pixel like this... |
|
|
||||||||||||||||||||||||||||||||||||||||||||||||||||||||||||||||||||||||||||
char *video; int main(void) { /* set the video mode here */ __djgpp_nearptr_enable() /* Find out where video memory is. */ video = __djgpp_conventional_base + 0xA0000; video[0] = 15; /* and when your done ... */ __djgpp_nearptr_disable(); /* go back to text mode here */ return 0; } |
|
|
||||||||||||||||||||||||||||||||||||||||||||||||||||||||||||||||||||||||||||
|
When your done you should put memory protection back by using __djgpp_nearptr_disable(). Make note, however, that __djgpp_nearptr_disable() is slow. Therefore you should do as much as you can before calling this function. It is possible to leave memory protection off for good but I wouldn't recommend it because of the risks involved. If your interested, every one of those "video[?] = ?" lines compiles to one assembly language mov instruction and, therefore, typically take only 1 clock tick on current hardware. Also, the __djgpp_conventional_base variable is said to change every once in a while. Particualarly after memory allocations, so don't assume it'll be the same all the time. However, it should be safe to calculate your location of video memory only once per frame. In fact, some have done tests to show that __djgpp_conventional_base rarely every changes, but remember, don't assume. If DJ says it might, it might. Keep that in mind. |
|
|
||||||||||||||||||||||||||||||||||||||||||||||||||||||||||||||||||||||||||||
Lines |
|
|
||||||||||||||||||||||||||||||||||||||||||||||||||||||||||||||||||||||||||||
|
So now you know how to plot pixels but you want to learn how to draw lines and circles, right? Well, let's start off with some lines. How can one go about drawing lines on a computer? Well, first of all, you have to take into consideration that your line will not be perfect. It can't be because the PC's video hardware is digital; It has a finite resolution. And the pixels are square, which will make the line look jagged. None-the-less, convincing lines are possible. |
|
|
||||||||||||||||||||||||||||||||||||||||||||||||||||||||||||||||||||||||||||
|
One of the most common ways of drawing a line is by using Bresenham's line drawing algorithm. The algorithm requires no multiplications, divisions or floating point math and is, therefore, very fast on PC hardware. The bresenham algorithm realises that lines on a PC will not be perfect. They will have some ammount of error to them. In fact, this ammount of error is exactly what the bresenham algorithm uses to create lines! |
|
|
||||||||||||||||||||||||||||||||||||||||||||||||||||||||||||||||||||||||||||
|
To understand the bresenham technique to drawing lines you must realise that each pixel on the line will either lie exactly on the true line or to one side of the true line. The ammount by which the computer line defers from the true line will be the line's error. When drawing the line we can use the error to determine if another pixel would give a better approximation of the true line. |
|
|
||||||||||||||||||||||||||||||||||||||||||||||||||||||||||||||||||||||||||||
|
So how do we implement all this? Well, first of all, we switch the coordinates of the line if needed, so that the line is travelling from top to bottom. This way we illiminate some of the unknown information about the line. Now we know the line is going from top to bottom. Next we must determine what is the major axis of our line. The major axis is just the axis, x or y, which best describes the line. With that defined we traverse along this axis and test the error. If it is greater than or equal to 0 then we increase the minor axis, otherwise it stays the same. Then we adjust the error for the next pixel and repeat. Here's some code to do this: |
|
|
||||||||||||||||||||||||||||||||||||||||||||||||||||||||||||||||||||||||||||
#include <dpmi.h> #include <conio.h> #include <sys/farptr.h> #define putpixel(x,y,c) _farpokeb(_dos_ds, 0xA0000 + y*320+x, c); void line(int x1, int y1, int x2, int y2, char c) { int delta_x, delta_y; int major_axis, direction; int double_delta_x; int double_delta_y; int diff_double_deltas; int error; // by making sure y1 is greater than y2 we eliminate different line // possibilites. So, if this condition is false, we just switch our // coordinates. Now we know the line goes from top to bottom. We just // need to know if it goes left to right or right to left. if(y1 > y2) { y1 ^= y2; // swap y1 and y2 y2 ^= y1; y1 ^= y2; x1 ^= x2; // swap x1 and x2 x2 ^= x1; x1 ^= x2; } delta_x = x2 - x1; // will determine L->R or R->L delta_y = y2 - y1; // has to be positive because line goes T->B if(delta_x > 0) // delta_x is positive: we're going left to right direction = 1; else { // delta_x is negative: we're going from right to left delta_x = -delta_x; // we need the absolute length of this axis later on direction = -1; } // find out what are major axis is if(delta_x > delta_y) major_axis = 0;// our main axis is the x else major_axis = 1; // our main axis in the y switch(major_axis) { // what is our main axis case 0: // major axis is the x double_delta_y = delta_y + delta_y; diff_double_deltas = double_delta_y - (delta_x + delta_x); error = double_delta_y - delta_x; putpixel(x1,y1,c); // plot our first pixel while(delta_x--) { // loop for the length of the major axis if(error >= 0) { // if the error is greater than or equal to zero: y1++; // increase the minor axis (y) error += diff_double_deltas; } else error += double_delta_y; x1 += direction; // increase the major axis to next pixel putpixel(x1,y1,c); // plot our pixel } break; case 1: // major axis is the y double_delta_x = delta_x + delta_x; diff_double_deltas = double_delta_x - (delta_y + delta_y); error = double_delta_x - delta_y; putpixel(x1,y1,c); // plot our first pixel while(delta_y--) { // loop for the length of the major axis if(error >= 0) { // if the error is greater than or equal to zero: x1 += direction; // increase the minor axis (x) error += diff_double_deltas; } else error += double_delta_x; y1++; // increase major axis to next pixel putpixel(x1,y1,c); // plot our pixel } break; } return; // we're done } |
|
|
||||||||||||||||||||||||||||||||||||||||||||||||||||||||||||||||||||||||||||
|
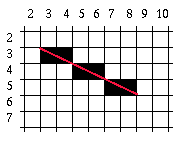
To better understand what is going on here, let's take a look at a simple example. Let's use the line defined by (3,3) (8,5). |
|
|
||||||||||||||||||||||||||||||||||||||||||||||||||||||||||||||||||||||||||||
|
Now, the first part of our function checks if the line is running from top to bottom. It is, so the coordinates stay the same, otherwise they would have to be switched. Next we find the delta (length) of each axis of our line.
delta_y = 5 - 3 = 2 |
 |
|
||||||||||||||||||||||||||||||||||||||||||||||||||||||||||||||||||||||||||||
|
Now we check to see if delta_x is negitive. If it is, that means that the line is going right to left and our direction would be set to -1. In this case, the line is going left to right. So we set our direction to 1. |
|
|
||||||||||||||||||||||||||||||||||||||||||||||||||||||||||||||||||||||||||||
|
Next we see which axis is the major axis, simply by checking which is larger. We then set the variable major_axis to reflect this. With the major axis found, we begin the actual drawing of the line using the appropriate procedure based upon this axis. In this case, the X axis is our major axis (so we set major_axis to 0). |
|
|
||||||||||||||||||||||||||||||||||||||||||||||||||||||||||||||||||||||||||||
|
Now we actually start making our line. First, we plot the first pixel of the line. Now we start looping for the length of the major axis (defined by delta_x). We decrease delta_x, then we check the error, which is set initially to (double_delta_y - delta_x) = (4 - 5) = -1. It is below zero so we do not change the minor axis. We add double_delta_y to error, therefore making it equal to (-1 + 4) = 3. And we increase the major axis by one, plot the pixel, and loop back. |
|
|
||||||||||||||||||||||||||||||||||||||||||||||||||||||||||||||||||||||||||||
|
Next we decrease delta_x again, then check the error, it's above 0 this time (3) so we increase the minor axis. We add diff_double_deltas to error, therefore bringing it to (3 + -6) = -3. Then we increase the major axis, plot our pixel, and loop back. |
|
|
||||||||||||||||||||||||||||||||||||||||||||||||||||||||||||||||||||||||||||
|
We now decrease delta_x, and check the error again, this time it's below zero (-3) so we keep the minor axis the same, increase the error by double_delta_y therefore bringing it to (-3 + 4) = 1. We increase the major axis, plot our pixel and loop back. |
|
|
||||||||||||||||||||||||||||||||||||||||||||||||||||||||||||||||||||||||||||
|
And we decrease delta_x again, and continue checking our error. The time it is above zero (1) so we increase the minor axis and add diff_double_deltas to our error, therefore bringing it to (1 + -6) = -5. We increase the major axis, plot our pixel and loop back. |
|
|
||||||||||||||||||||||||||||||||||||||||||||||||||||||||||||||||||||||||||||
|
Again, we decrease delta_x and check the error. This time it's below zero (-5) so we keep the minor axis the same. We add double_delta_y to our error, therefore bringing it to (-5 + 4) = -1. We increase the major axis, plot our pixel and loop back. |
|
|
||||||||||||||||||||||||||||||||||||||||||||||||||||||||||||||||||||||||||||
|
Yet again, we decrease delta_x and check our error. It is below zero so we keep the minor axis the same. We add double_delta_y to our error, therefore bringing it to (-1 + 4) = 3. We increase the major axis, plot our pixel and loop back. |
|
|
||||||||||||||||||||||||||||||||||||||||||||||||||||||||||||||||||||||||||||
|
This time when we loop back delta_x is -1, so we break out of our loop. Now we are done the line. If this is still confusing to you I suggest you go through the process with a few other lines to see what's going on. Also make sure you've got the code next to you so you can follow it better. It can be a complicated algorithm to grasp but once you get it, it all makes since. |
|
|
||||||||||||||||||||||||||||||||||||||||||||||||||||||||||||||||||||||||||||
Circles |
|
|
||||||||||||||||||||||||||||||||||||||||||||||||||||||||||||||||||||||||||||
|
Now for a circle routine. Circles are often regarded as being difficult to create on a computer, however, they are probably easier than you think. In this section I will reproduce Hardenburgh's circle algorithm. Hardenburgh realised that circles have a great deal of symetry in them and therefore, to draw a circle all you really have to do is draw 1/8th of a circle and repeat it. Remember back to math class when you defined a circle as:
|
|
|
||||||||||||||||||||||||||||||||||||||||||||||||||||||||||||||||||||||||||||
|
This comes from the fact that a circle actually encompases a triangle whose hypoteneuse is the radius of the circle and where x and y form the rest of a right angle triangle. Therefore creating the above Pythagorian equation. In simplest terms it just says that any point on a circle is of the exact same distance from the center of the circle. Now, also realise that the above equation can also be written as:
|
|
|
||||||||||||||||||||||||||||||||||||||||||||||||||||||||||||||||||||||||||||
|
What this means is that, given an x value, the corresponding y value can be found through this equation. Now, all we need to do loop for the length of x, calculating y along the way. However, since we're only doing 1/8 of the circle then we loop until x is equal to, or greater than y, therefore finishing our 1/8 arc. Here's some code: |
|
|
||||||||||||||||||||||||||||||||||||||||||||||||||||||||||||||||||||||||||||
#include <dpmi.h> #include <conio.h> #include <sys/farptr.h> #define putpixel(x,y,c) _farpokeb(_dos_ds, 0xA0000 + y*320+x, c); void circle(int x, int y, int r, char c) { int major = 0, minor = r; int squared_radius = r * r; do { putpixel(x+major, y-minor, c); putpixel(x-major, y-minor, c); putpixel(x+major, y+minor, c); putpixel(x-major, y+minor, c); putpixel(x+minor, y-major, c); putpixel(x-minor, y-major, c); putpixel(x+minor, y+major, c); putpixel(x-minor, y+major, c); major++; minor = sqrt(squared_radius - (minor * major)) + 0.5; } while(major <= minor); return; } |
|
|
||||||||||||||||||||||||||||||||||||||||||||||||||||||||||||||||||||||||||||
|
As you can see, this code is very simple. We use the variables major and minor to mark our major and minor axis. These are actually no more than x and y points of the circumference of the circle. We also have eight putpixel() statments. These are requried to mirror the 1/8th of the circle we draw, to create a full circle. |
|
|
||||||||||||||||||||||||||||||||||||||||||||||||||||||||||||||||||||||||||||
Changing the Palette |
|
|
||||||||||||||||||||||||||||||||||||||||||||||||||||||||||||||||||||||||||||
|
So now you've got the basics down but there is a lot more to graphics then just putting something on the screen. When you enter mode 0x13h you have 256 colours (all the colours are collectively called a palette) that you can use, but unless you change them you're stuck with the default colours. So how do you change the colours? You use the VGA palette register. The VGA allows you to change colours by sending the number (0 to 255) of the colour you want to change to port 0x3C8. And then by successivly sending the colour's new red, green and blue components to 0x3C9. It's actually quite simple. Here's a function that will change one colour at a time... |
|
|
||||||||||||||||||||||||||||||||||||||||||||||||||||||||||||||||||||||||||||
outportb(0x3C8,colour); outportb(0x3C9,red); outportb(0x3C9,green); outportb(0x3C9,blue); return; } |
|
|
||||||||||||||||||||||||||||||||||||||||||||||||||||||||||||||||||||||||||||
|
Those of you used to real-mode will notice that changing the palette doesn't change from real mode to protected mode. The r, g, and b values can range from 0 to 63. For those of you who are new to this type of colour system, I'll try to explain it to you. Each colour has three attributes: a red, green, and blue component which make up the colours. With all attributes at their highest (63) you would get the colour white. With all attributes at their lowest(0) you would get black. |
|
|
||||||||||||||||||||||||||||||||||||||||||||||||||||||||||||||||||||||||||||
|
You should also note that once you've sent a colour to the VGA it automatically increments to the next colour. Therefore, to set the whole palette, you can send 0 to port 0x3C8 and then send all 256 colour's red, green and blue components, one after the other. |
|
|
||||||||||||||||||||||||||||||||||||||||||||||||||||||||||||||||||||||||||||
Virtual Screens |
|
|
||||||||||||||||||||||||||||||||||||||||||||||||||||||||||||||||||||||||||||
|
Now, as promised, I will talk about virtual screens. Virtual screens are, quite simply, an array of memory that you draw your images to instead of the video memory and then when done you copy this array to video memory. The reason for this? It looks a lot better and it's fast. When you use virtual screens the viewer can't see the graphics being drawn on the screen until they are completely done. Virtual screens are also fast because you compose the image in near data, and then you can copy it dwords at a time. Virtual screens are also very easy to implement, here's an example... |
|
|
||||||||||||||||||||||||||||||||||||||||||||||||||||||||||||||||||||||||||||
char virtscreen[64000]; /* 320*200 bytes long */ int main(void) { /* set the video mode here */ /* do all you need to the virtual screen here: lines, circles, points, etc */ virtscreen[0] = 15; /* when done copy it to video memory like this... */ dosmemput(virtscreen, sizeof(virtscreen), 0xA0000); /* or */ movedata(_my_ds(), virtscreen, _dos_ds, 0xA0000, sizeof(virtscreen)); /* go back to text mode */ return 0; } |
|
|
||||||||||||||||||||||||||||||||||||||||||||||||||||||||||||||||||||||||||||
|
Writing to the virtual screen is very easy. All you do is, instead of writing to 0xA0000 + offset, you write to &virt + offset. In the above code I write to the virtual screen the exact same way you would write to a regular array. Afterall, a virtual screen IS just a regular array! |
|
|
||||||||||||||||||||||||||||||||||||||||||||||||||||||||||||||||||||||||||||
VESA SVGA |
|
|
||||||||||||||||||||||||||||||||||||||||||||||||||||||||||||||||||||||||||||
|
So now you know how to program in 320x200x256 but you will soon find out that mode 0x13h has chunky pixels and only 64000 of them. So how about Super VGA modes? When you enter the Super VGA world you get 640x480x256, 800x600x256, 1024x768x256, 1280x1024x256 and even more video modes. Of course if your looking for speed you wouldn't want to use 1280x1024x256 because that means you have to update 1,310,720 pixels per frame! You also have to keep in mind that most people can't support these monster video modes. The best video modes to use would probably have to be 640x480x256 or 800x600x256 but I'll show you how to use all of the above. |
|
|
||||||||||||||||||||||||||||||||||||||||||||||||||||||||||||||||||||||||||||
|
In all the following SVGA examples we will be using VESA (Video Electronics Standards Asociation) commands. VESA provides a set of common routines for many different types of video cards. This way you don't have to learn how to program every differenent SVGA card. Before we can use the VESA commands, though, we should check to see if the video card supports VESA. |
|
|
||||||||||||||||||||||||||||||||||||||||||||||||||||||||||||||||||||||||||||
__dpmi_regs regs; assert(sizeof(*vbeinfo) < _go32_info_block.size_of_transfer_buffer ); regs.x.ax = 0x4F00; regs.x.di = __tb & 0x0F; regs.x.es = (__tb >> 4) & 0xFFFF; dosmemput(vbeinfo, sizeof(*vbeinfo), __tb); __dpmi_int(0x10, ®s); dosmemget(__tb, sizeof(*vbeinfo), vbeinfo); if(strncmp(vbeinfo->VESASignature, "VESA", 4) != 0) return 0; else return vbeinfo->VESAVersion; } |
|
|
||||||||||||||||||||||||||||||||||||||||||||||||||||||||||||||||||||||||||||
|
The VESA detection routine requires a memory buffer in conventional memory where it will return all the information about the card. We could use __dpmi_allocate_dos_memory() with the size of sizeof(VBE_VgaInfo) although there is an easier way. DJGPP uses a globally available transfer buffer which is about 4KB in size. We can use this buffer as our conventional memory buffer. After the call to VESA function 0x4F00 we will just copy the transfer buffer to our VBE_VgaInfo structure. The buffer is called __tb and in defined in go32.h. For us to use it we need a segment and offset pair, even though we're in protected mode, because VESA functions (with the exception of version 2.0 which I'll discuss later) go back to real mode to acomplish their tasks. The offset is equal to __tb & 0x0F and the segment is equal to (__tb >> 4) & 0xFFFF. |
|
|
||||||||||||||||||||||||||||||||||||||||||||||||||||||||||||||||||||||||||||
|
You may realise that we use a structure called VBE_VgaInfo. In VESA we use two main structures: the VBE_VgaInfo structure and the VBE_ModeInfo structure. Here's what each of them look like... |
|
|
||||||||||||||||||||||||||||||||||||||||||||||||||||||||||||||||||||||||||||
#pragma pack(1) /* SuperVGA information block */ typedef struct { char VESASignature[4] PACKED; /* 'VESA' 4 byte signature */ short VESAVersion PACKED; /* VBE version number */ char *OEMStringPtr PACKED; /* Pointer to OEM string */ long Capabilities PACKED; /* Capabilities of video card */ short *VideoModePtr PACKED; /* Pointer to supported modes */ short TotalMemory PACKED; /* Number of 64kb memory blocks */ char reserved[236] PACKED; /* Pad to 256 byte block size */ } VBE_VgaInfo; /* SuperVGA mode information block */ typedef struct { short ModeAttributes PACKED; /* Mode attributes */ char WinAAttributes PACKED; /* Window A attributes */ char WinBAttributes PACKED; /* Window B attributes */ short WinGranularity PACKED; /* Window granularity in k */ short WinSize PACKED; /* Window size in k */ short WinASegment PACKED; /* Window A segment */ short WinBSegment PACKED; /* Window B segment */ void *WinFuncPtr PACKED; /* Pointer to window function */ short BytesPerScanLine PACKED; /* Bytes per scanline */ short XResolution PACKED; /* Horizontal resolution */ short YResolution PACKED; /* Vertical resolution */ char XCharSize PACKED; /* Character cell width */ char YCharSize PACKED; /* Character cell height */ char NumberOfPlanes PACKED; /* Number of memory planes */ char BitsPerPixel PACKED; /* Bits per pixel */ char NumberOfBanks PACKED; /* Number of CGA style banks */ char MemoryModel PACKED; /* Memory model type */ char BankSize PACKED; /* Size of CGA style banks */ char NumberOfImagePages PACKED; /* Number of images pages */ char res1 PACKED; /* Reserved */ char RedMaskSize PACKED; /* Size of direct color red mask */ char RedFieldPosition PACKED; /* Bit posn of lsb of red mask */ char GreenMaskSize PACKED; /* Size of direct color green mask */ char GreenFieldPosition PACKED; /* Bit posn of lsb of green mask */ char BlueMaskSize PACKED; /* Size of direct color blue mask */ char BlueFieldPosition PACKED; /* Bit posn of lsb of blue mask */ char RsvdMaskSize PACKED; /* Size of direct color res mask */ char RsvdFieldPosition PACKED; /* Bit posn of lsb of res mask */ char DirectColorModeInfo PACKED; /* Direct color mode attributes */ /* VESA 2.0 variables */ long PhysBasePtr; /* physical address for flat frame buffer */ long OffScreenMemOffset; /* pointer to start of off screen memory */ short OffScreenMemSize; /* amount of off screen memory in 1k units */ char res2[206] PACKED; /* Pad to 256 byte block size */ } VBE_ModeInfo; #pragma pack() |
|
|
||||||||||||||||||||||||||||||||||||||||||||||||||||||||||||||||||||||||||||
|
Some of you who are used to VESA programming in real mode will instantly notice the PACKED attribute. This just tells the compiler to align variables to bytes and fields to bits. So now we have some information about the SVGA card installed. Now what? Well, first you might want to check the VESA version number which is returned by the above function. It's in hexidecimal so version 2.0 is 0x2000. Next you might want to find out some information about a specific video mode. Here's how to do this in VESA... |
|
|
||||||||||||||||||||||||||||||||||||||||||||||||||||||||||||||||||||||||||||
__dpmi_regs regs; assert(sizeof(*modeinfo) < _go32_info_block.size_of_transfer_buffer); regs.x.ax = 0x4F01; regs.x.cx = mode; regs.x.di = __tb & 0x0F; regs.x.es = (__tb >> 4) & 0xFFFF; __dpmi_int(0x10, ®s); dosmemget(__tb, sizeof(*modeinfo), modeinfo); return; } |
|
|
||||||||||||||||||||||||||||||||||||||||||||||||||||||||||||||||||||||||||||
|
Again we use the DJGPP tranfer buffer for our conventional memory buffer. Now you've got all the information necessary to program in VESA SVGA. |
|
|
||||||||||||||||||||||||||||||||||||||||||||||||||||||||||||||||||||||||||||
|
Since we're working in Super VGA you'll have to check if a certain video mode is available before you using it. The reason for this? Every current VGA card can do mode 0x13h but not all SVGA cards can do all SVGA modes. For a full listing of VGA/SVGA/TEXT video modes check out the table at the end of this chapter. The easiest way to check if a video mode is supported is to try to enter it. Here's some code... |
|
|
||||||||||||||||||||||||||||||||||||||||||||||||||||||||||||||||||||||||||||
#define NOT_SUPPORTED 0 int check_640x480x256(void) { __dpmi_regs regs; regs.x.ax = 0x4F02; regs.x.bx = 0x101; __dpmi_int(0x10, ®s); if(regs.x.ax == 0x4F) return SUPPORTED; else return NOT_SUPPORTED; } |
|
|
||||||||||||||||||||||||||||||||||||||||||||||||||||||||||||||||||||||||||||
|
This will try to set the mode and then check the register ax. If ax = 0x4F that means that you we're able to set the video mode. Of course, after running this procedure you will be set into that video mode if the test was successful. Notice that setting the video mode is a bit different in SVGA. We set ax to 0x4F02 instead of the video mode and then set bx to the video mode. Now what do we do? Let's try to put a pixel on the screen. But wait! To access all the video memory in a Super VGA mode you have to switch memory banks occasionally. Here's some code that takes care of that... |
|
|
||||||||||||||||||||||||||||||||||||||||||||||||||||||||||||||||||||||||||||
#include <dpmi.h> #include <sys/farptr.h> int curbank=0; int bytesperline = 640; /* your maximum X value */ void putpixel(int x, int y, char c) { long addr = (long)y * bytesperline + x; setbank((int)(addr >> 16)); _farpokeb(_dos_ds,0xA0000 + (addr & 0xFFFF), c); return; } void setbank(int bank) { __dpmi_regs regs; if (bank == curbank) return; /* dont switch banks if your already there */ curbank = bank; /* Canging bank? Save it! */ bank <<= modeinfo. WinGranularity regs.x.ax = 0x4F05; regs.x.bx = 0; regs.x.dx = bank; __dpmi_int(0x10, ®s); regs.x.ax = 0x4F05; regs.x.bx = 1; regs.x.dx = bank; __dpmi_int(0x10, ®s); return; } |
|
|
||||||||||||||||||||||||||||||||||||||||||||||||||||||||||||||||||||||||||||
|
Now lets take a look at what we just did. When we put a pixel we use "y * Max_X + x" again to find out exactly where in video memory we should put this pixel. Then we go to SVGA bank "addr >> 16." The explanation for this is fairly simple. Each SVGA bank is 65,536 bytes, which is the biggest number 16 bits can represent. Therefore dividing the "addr" variable by 65,536 is the same as shifting it right 16 bits. If you don't understand the above just remember this "addr / 65536" = "addr >> 16." The line "bank <<= modeinfo.WinGranularity" isn't actually needed on most cards but keep it there for compatibility. |
|
|
||||||||||||||||||||||||||||||||||||||||||||||||||||||||||||||||||||||||||||
|
So why do we have to switch banks? Try the above example without bank switching and you will see that only the top part of the screen gets written to. This is because video memory at 0xA0000 can only be 65,536 bytes (64k) long, but a 640x480x256 screen takes up 307,200 bytes. When you switch banks it makes the video memory at 0xA0000 point to a different part of the screen, therefore allowing you to write to the whole 640x480x256 screen. Notice that we check to see if the bank we're changing to is the current bank. This isn't necessary but makes the program run "a lot" faster. |
|
|
||||||||||||||||||||||||||||||||||||||||||||||||||||||||||||||||||||||||||||
|
Now you want to get some lines and circles in SVGA, right? Well that's easy! You've already got line and circle functions that will work perfectly with SVGA. The only think you have make sure of is that they are calling the Super VGA version of the putpixel(x,y,c) function instead of our old mode 0x13 putpixel(x,y,c) function. |
|
|
||||||||||||||||||||||||||||||||||||||||||||||||||||||||||||||||||||||||||||
VESA 2.0 - Linear Frame Buffer |
|
|
||||||||||||||||||||||||||||||||||||||||||||||||||||||||||||||||||||||||||||
|
So you like the big screen sizes of SVGA but not all the bank switching stuff, huh? Well, this was a common complaint among SVGA programmers when VESA came out with the first VESA specification. Since then VESA 2.0 has been born. VESA 2.0 encompases a more robust version of VESA 1.2 and allows a big feature called the "Linear Frame Buffer." The linear frame buffer is a pointer directly to your cards video memory and allows linear writes to video memory without bank switching! It's just like writing to video memory in VGA mode 0x13 but you have all the advances of SVGA. |
|
|
||||||||||||||||||||||||||||||||||||||||||||||||||||||||||||||||||||||||||||
|
VESA 2.0 provides the functions to access the linear frame buffer but unfortunately that doesn't mean that one exists. If you don't find a linear frame buffer you can use another feature of VESA 2.0 : protected mode bank switching, which I'll talk about later. |
|
|
||||||||||||||||||||||||||||||||||||||||||||||||||||||||||||||||||||||||||||
|
VESA 2.0 is fairly new as the time of this writing so some cards will not support it at all but there is a program called UNIVBE from SciTech which allows you to install VESA 2.0 capabilites on your card. This also means that you, as a good programmer, should check to see if VESA 2.0 is installed on the video card before trying VESA 2.0 routines. We already have a function to do this so we just have to check the return value... |
|
|
||||||||||||||||||||||||||||||||||||||||||||||||||||||||||||||||||||||||||||
int main(void) { if(VBE_detect(&vgainfo) < 0x200) { printf("Your card does not support VESA 2.0\n"); exit(1); } return 0; } |
|
|
||||||||||||||||||||||||||||||||||||||||||||||||||||||||||||||||||||||||||||
|
VESA 2.0 allows you to access the linear frame buffer but it does not ensure that one exists. What this means is that some cards cannot be put into linear mode therefore you must check to see if a linear frame buffer exists. This can be done by getting information about the video mode you want to enter and checking the frame buffer bit in the mode attributes variable... |
|
|
||||||||||||||||||||||||||||||||||||||||||||||||||||||||||||||||||||||||||||
int main(void) { VBE_getmodeinfo(0x101, &modeinfo); if(modeinfo.ModeAttributes & 0x8) printf("Linear frame buffer found\n"); else { printf("Linear frame buffer not found\n"); exit(1); } return 0; } |
|
|
||||||||||||||||||||||||||||||||||||||||||||||||||||||||||||||||||||||||||||
|
If the card supports a linear frame buffer than you will now have to get a pointer to it. This can be done like this... |
|
|
||||||||||||||||||||||||||||||||||||||||||||||||||||||||||||||||||||||||||||
void VBE_get_linear_address(int mode) { VBE_ModeInfo modeinfo; __dpmi_meminfo mem; VBE_getmodeinfo(mode, &modeinfo); mem.size = (unsigned long)(modeinfo.XResolution * modeinfo.YResolution); mem.address = modeinfo.PhysBasePtr; __dpmi_physical_address_mapping(&mem); linear_address = mem.address; return; } |
|
|
||||||||||||||||||||||||||||||||||||||||||||||||||||||||||||||||||||||||||||
|
This will setup the global variable linear_address as a pointer to the linear frame buffer. Now you can use this pointer as you did with 0xA0000 in VGA mode 0x13. Here's a near pointer example... |
|
|
||||||||||||||||||||||||||||||||||||||||||||||||||||||||||||||||||||||||||||
VBE_setmode(0x4103); /* 800x600x256 */ __djgpp_nearptr_enable(); video[y * Max_X + x + __djgpp_conventional_base] = (char)rand() % 255; __djgpp_nearptr_disable(); |
|
|
||||||||||||||||||||||||||||||||||||||||||||||||||||||||||||||||||||||||||||
|
The first thing you probably noticed was that, when setting the mode, I used mode 0x4103 instead of 0x103. The reason for this is simple. The 4 tells VESA 2.0 that you want to have access to the linear frame buffer. If you aren't quite secure in using near pointers yet you can still use far pointers. The only problem is that you don't have a selector to use. We can get around this, though, by making our own selector! Here's how... |
|
|
||||||||||||||||||||||||||||||||||||||||||||||||||||||||||||||||||||||||||||
void make_selector(void) { video_selector = __dpmi_allocate_ldt_descriptors(1); __dpmi_set_segment_base_address( video_selector, linear_address); __dpmi_set_segment_limit( video_selector, 2000000L); /* 2 Megs */ return; } |
|
|
||||||||||||||||||||||||||||||||||||||||||||||||||||||||||||||||||||||||||||
|
We just make a selector out of the variable video_selector and assigned it a length of 2 megabytes. This should be enough for most video modes but you may have to increase it for some really big modes. So how do we use our new selector? Easy... we use the same far functions we did in VGA mode 0x13... |
|
|
||||||||||||||||||||||||||||||||||||||||||||||||||||||||||||||||||||||||||||
short video_selector #define putpixel(x, y, c) _farpokeb(video_selector, y * Max_X + x, c); VBE_get_linear_address(0x103); make_selector(); VBE_setmode(0x4103); putpixel(x,y,(char)rand() % 255); textmode(); |
|
|
||||||||||||||||||||||||||||||||||||||||||||||||||||||||||||||||||||||||||||
|
You can also use dosmemput() and movedata() like you did in VGA mode 0x13. |
|
|
||||||||||||||||||||||||||||||||||||||||||||||||||||||||||||||||||||||||||||
VESA 2.0 - Protected Mode Interface |
|
|
||||||||||||||||||||||||||||||||||||||||||||||||||||||||||||||||||||||||||||
|
Now you know how to use the linear frame buffer but what if the graphics card doesn't support one? In earlier versions of VESA, when you switched banks the interface would jump to real mode from protected mode and then back again, which was slow. VESA 2.0 corrects this problem with a small protected mode interface. All the functions are defined in the structure below... |
|
|
||||||||||||||||||||||||||||||||||||||||||||||||||||||||||||||||||||||||||||
unsigned short setWindow PACKED; unsigned short setDisplayStart PACKED; unsigned short setPalette PACKED; unsigned short IOPrivInfo PACKED; /* actual code is located here */ } PM_Int; |
|
|
||||||||||||||||||||||||||||||||||||||||||||||||||||||||||||||||||||||||||||
|
Notice that we still use the packed attribute for our structures. The variables contained in this structure are actually offsets from the beginning of the structure which point to where the actual function resides. What this means is that the protected mode banking funtion is located at PM_Int + setWindow. Of course before you can use these functions you have to fill the structure. Here's how we would do it... |
|
|
||||||||||||||||||||||||||||||||||||||||||||||||||||||||||||||||||||||||||||
void (*pm_bank)(char) = NULL; void VBE_get_pm_interface(void) { __dpmi_regs regs; regs.x.ax = 0x4F0A; /* retrieve pmode interface */ regs.x.bx = 0; __dpmi_int(0x10, ®s); if (regs.h.ah) { /* (AH != 0) == error */ printf("Error"); exit(1); } if (pm_info) free(pm_info); /* free it if it's allocated */ pm_info = (PM_Int *)malloc(regs.x.cx); /* copy into our address space */ _go32_dpmi_lock_data(pm_info, regs.x.cx); dosmemget((regs.x.es*16)+regs.x.di, regs.x.cx, pm_info); pm_bank = (void *)((char *)pm_info + pm_info->setWindow); return; } |
|
|
||||||||||||||||||||||||||||||||||||||||||||||||||||||||||||||||||||||||||||
|
This function uses the VESA 2.0 function 0x4F0A to get the protected mode interface. The interface is then located at segment regs.x.es with an offset of regs.x.di but since we're in protected mode we must convert this segment/offset pair into a 32bit address. This is easily done in the dosmemget() line which retrieves the protected mode interface into the pm_info structure. The last line of the function assigns the protected mode banking function to the variable pm_bank and we're done. One thing you should always remember when using the protected mode interface is to free it when your done. If you don't it'll just waste memory. Now we use this function just like the regular banking function we used earlier... |
|
|
||||||||||||||||||||||||||||||||||||||||||||||||||||||||||||||||||||||||||||
long addr = (long)y * bytesperline + x; pm_bank((int)(addr >> 16)); _farpokeb(_dos_ds,0xA0000 + (addr & 0xFFFF), c); return; } |
|
|
||||||||||||||||||||||||||||||||||||||||||||||||||||||||||||||||||||||||||||
High/True Colour Modes |
|
|
||||||||||||||||||||||||||||||||||||||||||||||||||||||||||||||||||||||||||||
|
Now lets talk (very briefly) about video modes with more that 256 colours. Most video modes use a video memory configuration where each pixel relates to a byte of memory. Anything over 256 colours uses more than one byte per pixel. For example one byte is 8 bits, right? Well, in a 256 colour mode you can fit the numbers 0-255 in an 8-bit byte so there's no problem. But what about a 65536 colour mode? 0-65535 wont fit in an 8-bit byte so we have to use 16-bit words to hold our colours. What does this mean? Not much! All it really means is that to plot one pixel in a 65536 colour mode we have to set two bytes of video memory (or one word, same thing) to the certain colour. This also means the 640x480x65536 will be two times slower than 640x480x256 because you must update two times as much memory. If your really interested in high or true colour graphics programming you should look around the 'net for ways to optimize your code because it will be slower. When you go to 24 bit colour you must poke 3 bytes for each pixel and so on. |
|
|
||||||||||||||||||||||||||||||||||||||||||||||||||||||||||||||||||||||||||||
|
So how do we use the code for 256 colour modes in, say, a 65536 colour mode? Well, first of all you have to change all your colour variables from char's (8-bits) to short's (16-bits) because 65536 is a 16-bit number. The bytes per line is now equal to Max_X * 2 because a short is two times the length of a char. Here's an example of a 65536 colour putpixel... |
|
|
||||||||||||||||||||||||||||||||||||||||||||||||||||||||||||||||||||||||||||
void putpixel(int x, int y, short c) { /* remember the colour is a short (16 bit) */ long addr = (long)y * bytesperline + (x*2); setbank((int)(addr >> 16)); _farpokew(_dos_ds, 0xA0000 + (addr & 0xFFFF), c); return; } |
|
|
||||||||||||||||||||||||||||||||||||||||||||||||||||||||||||||||||||||||||||
Video/Text Modes Listing |
|
|
||||||||||||||||||||||||||||||||||||||||||||||||||||||||||||||||||||||||||||
Super VGA text modes
VGA graphics modes
VGA text modes
Note : 32k = 32,768 colours 65k = 65,536 colours 16M = 16,777,216 colours MONO = Monochrome (One colour and black) |
I got this list out of the "supported video modes" section of my video card users guide so some video modes are missing but most are here. You shouldn't need anymore that this anyway.
|
|
||||||||||||||||||||||||||||||||||||||||||||||||||||||||||||||||||||||||||||